- Published on
Nginx 常用功能
- Authors
- Name
- 三金得鑫
- 掘金
- 掘金
安装
- 在阿里云 ECS 上安装
nginx,需要先安装gcc-c++编译器 - 然后安装
nginx依赖的pcre和zlib包 - 最后安装
nginx
# 下载安装包之类的,一般会需要超级管理员权限,所以如果你并不是在 root 用户下,则需要使用 sudo
# 先安装gcc-c++编译器
yum install gcc-c++
yum install -y openssl openssl-devel

# 安装pcre包
yum install -y pcre pcre-devel

# 安装zlib包
yum install -y zlib zlib-devel

# 创建nginx文件夹
mkdir /usr/local/nginx

# 下载或上传安装包
wget https://nginx.org/download/nginx-1.19.9.tar.gz

# 解压并进入nginx目录
tar -zxvf nginx-1.19.9.tar.gz
cd nginx-1.19.9

# 使用nginx默认配置
./configure

# 编译安装
make
make install

# 进入sbin,启动Nginx
./nginx

# 查看是否启动成功
ps -ef | grep nginx
常用的 Nginx 命令
- 启动 Nginx
# 进入 nginx 安装目录下的 sbin 目录
./nginx
- 重载配置
./nginx -s reload
- 测试配置文件是否正确
./nginx -t -c /usr/local/nginx/conf/nginx.conf
- 快速停止服务
./nginx -s stop
- 重启 Nginx
./nginx -s reopen
- 查看 nginx 的进程信息
ps -ef | grep nginx
Nginx 配置详解
一般 nginx 的配置文件在 nginx 安装目录的 conf目录里,名称叫做 nginx.conf。
我们通过 vim命令来进行更改:
# 在 nginx/conf/ 路径下
sudo vi nginx.conf
默认的配置文件如下:
#user  nobody;
worker_processes  1;

#error_log  logs/error.log;
#error_log  logs/error.log  notice;
#error_log  logs/error.log  info;

#pid        logs/nginx.pid;


events {
    worker_connections  1024;
}


http {
    include       mime.types;
    default_type  application/octet-stream;

    #log_format  main  '$remote_addr - $remote_user [$time_local] "$request" '
    #                  '$status $body_bytes_sent "$http_referer" '
    #                  '"$http_user_agent" "$http_x_forwarded_for"';

    #access_log  logs/access.log  main;

    sendfile        on;
    #tcp_nopush     on;

    #keepalive_timeout  0;
    keepalive_timeout  65;

    #gzip  on;

    server {
        listen       80;
        server_name  localhost;

        #charset koi8-r;

        #access_log  logs/host.access.log  main;

        location / {
            root   html;
            index  index.html index.htm;
        }

        #error_page  404              /404.html;

        # redirect server error pages to the static page /50x.html
        #
        error_page   500 502 503 504  /50x.html;
        location = /50x.html {
            root   html;
        }

        # proxy the PHP scripts to Apache listening on 127.0.0.1:80
        #
        #location ~ \.php$ {
        #    proxy_pass   http://127.0.0.1;
        #}

        # pass the PHP scripts to FastCGI server listening on 127.0.0.1:9000
        #
        #location ~ \.php$ {
        #    root           html;
        #    fastcgi_pass   127.0.0.1:9000;
        #    fastcgi_index  index.php;
        #    fastcgi_param  SCRIPT_FILENAME  /scripts$fastcgi_script_name;
        #    include        fastcgi_params;
        #}

        # deny access to .htaccess files, if Apache's document root
        # concurs with nginx's one
        #
        #location ~ /\.ht {
        #    deny  all;
        #}
    }


    # another virtual host using mix of IP-, name-, and port-based configuration
    #
    #server {
    #    listen       8000;
    #    listen       somename:8080;
    #    server_name  somename  alias  another.alias;

    #    location / {
    #        root   html;
    #        index  index.html index.htm;
    #    }
    #}


    # HTTPS server
    #
    #server {
    #    listen       443 ssl;
    #    server_name  localhost;

    #    ssl_certificate      cert.pem;
    #    ssl_certificate_key  cert.key;

    #    ssl_session_cache    shared:SSL:1m;
    #    ssl_session_timeout  5m;

    #    ssl_ciphers  HIGH:!aNULL:!MD5;
    #    ssl_prefer_server_ciphers  on;

    #    location / {
    #        root   html;
    #        index  index.html index.htm;
    #    }
    #}

}
那乍一看乱七八糟一大堆,其实我们常用的也就以下十个左右:
- http:定义 HTTP 服务相关的参数,比如监听端口、默认类型等;
- server:定义虚拟主机相关的参数,比如监听地址、根目录、错误页面等;
- location:定义 URL 路径的匹配规则以及对应的处理方式,比如使用正则表达式以及反向代理等;
- upstream:定义了反向代理服务器的地址以及相关参数,比如负载均衡算法、健康检查间隔等;
- proxy_pass:定义反向代理到的后端服务器地址以及端口号
- root:访问资源的根目录,通常用于映射 URL 路径与本地文件系统路径;
- index:默认的文件访问顺序,用户访问一个目录时,会按照该配置指定的顺序依次查找对应的文件;
- error_page:定义了错误页面的展示方式,比如 404 和 500等
- log_format:定义日志格式,可以自定义不同字段的输出格式;
- include:可以将其他的配置文件包含进来,便于管理和维护;
比如我们现在要部署两个静态站点:
- blog:静态的博客站点
- note:笔记后台前端站点
那么它们的 nginx 配置如下:
#user  nobody;
worker_processes  1;

events {
    worker_connections  1024;
}


http {
    include       mime.types;
    default_type  application/octet-stream;

    sendfile        on;
    keepalive_timeout  65;

    server {
        listen       80;
        server_name  note.ihsxu.com;

        location / {
            root   /var/www/md-note/blog;
            index  index.html index.htm;
        }

        error_page   500 502 503 504  /50x.html;
        location = /50x.html {
            root   html;
        }
    }
}
重载配置之后,我们就可以通过输入对应的 server_name 来访问我们的静态站点了。
如果你有买域名并成功备案,还可以到云解析 DNS页面进行域名解析,解析好之后,就可以通过域名来访问你的网站。
配置反向代理
我们通过配置反向代理,可以将所有客户端的请求转发到另一个服务器上,并将响应返回给客户端,这样可以在一定程度上保护应用程序的安全性,提供应用程序的性能和稳定性。
在 Nginx 中配置反向代理,可以在同一个 server 下进行设置:
server {
    listen 80;
    server_name example.com;

    location / {
        root /var/www/html;
        index index.html;
    }

    # 最后一定要有 /,不然不起作用
    location /api/ {
        proxy_pass        http://127.0.0.1:3000;
        proxy_set_header  Host $proxy_host
    }
}
在这里我们通过配置 proxy_pass 来设置要代理的服务地址,然后再通过 proxy_set_header 来设置客户端在传递请求时,将客户端发出的 HTTP 请求头中的 Host 字段设置为代理服务器的域名或者 IP 地址。
配置完之后执行 nginx -s reload重载配置。
⚠️注意
注意这里有个坑啊,那就是 location 关键字后面配置的接口前缀,后面是有一个
/的,如果只直接设置成了/api,那大概率在请求接口的时候会导致 404 错误。
配置 SSL(HTTPS)
- 首先,要配置 SSL 需要先给 Nginx 上安装 ssl 模块(在配置时需要先停掉 Nginx);
# configure 脚本在 nginx-1.19.9 目录中
./configure --prefix=/usr/local/nginx --with-http_stub_status_module --with-http_ssl_module
2.安装好以后需要再使用 make编译一次;
3.使用刚刚编译好的 nginx指令覆盖原来的 /usr/local/nginx/sbin/nginx指令
cp ./objs/nginx /usr/local/nginx/sbin/
4.到这一步的时候,我们就需要去申请一些 SSL 证书了
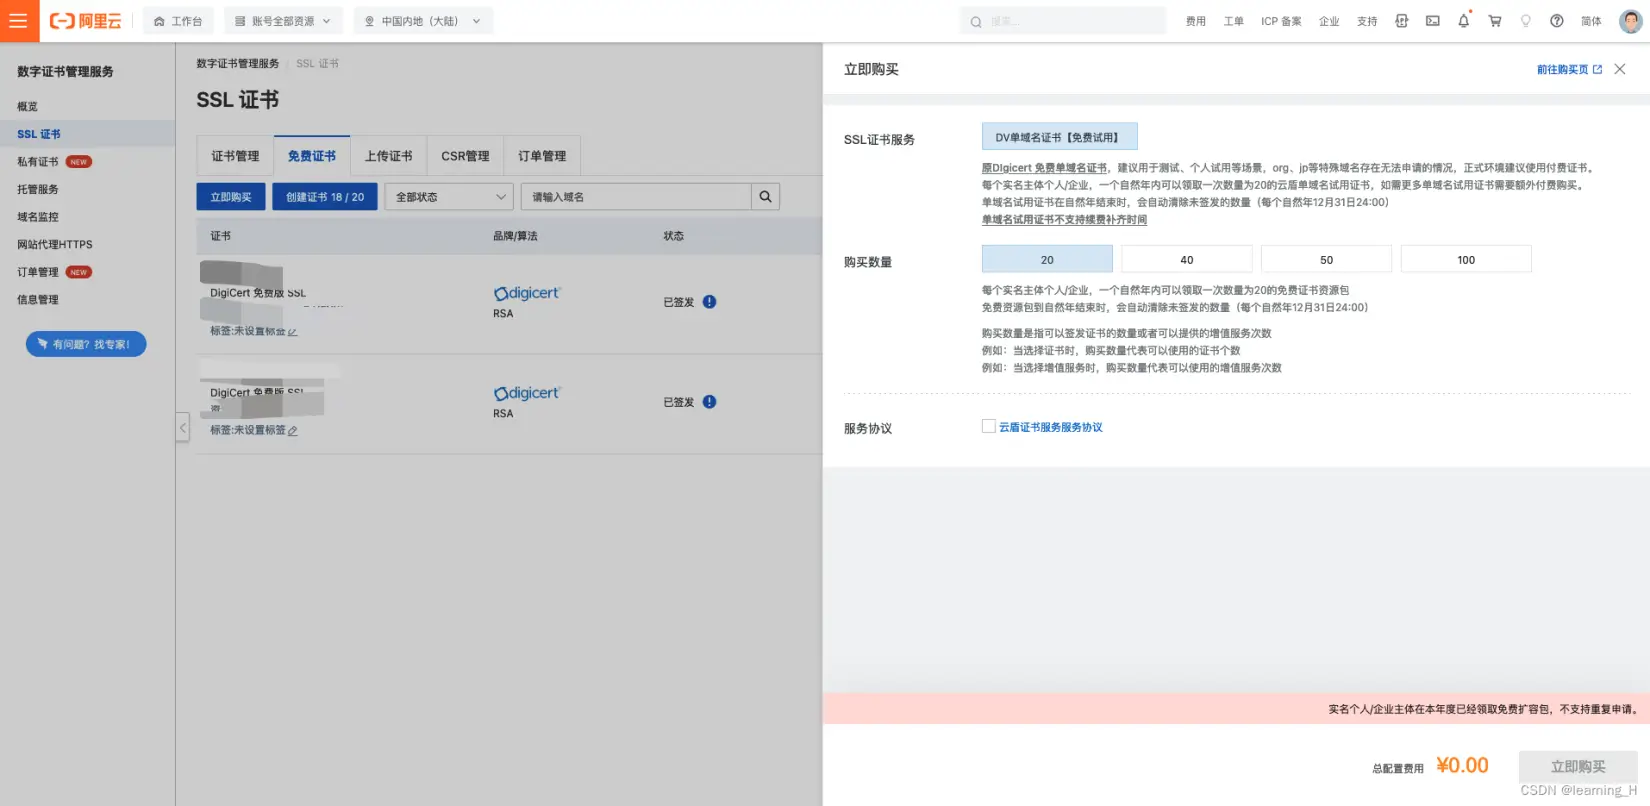
5.我们可以从阿里云的数字证书管理服务申请的一年免费 SSL 证书。一年可以免费申请 20 张免费证书。

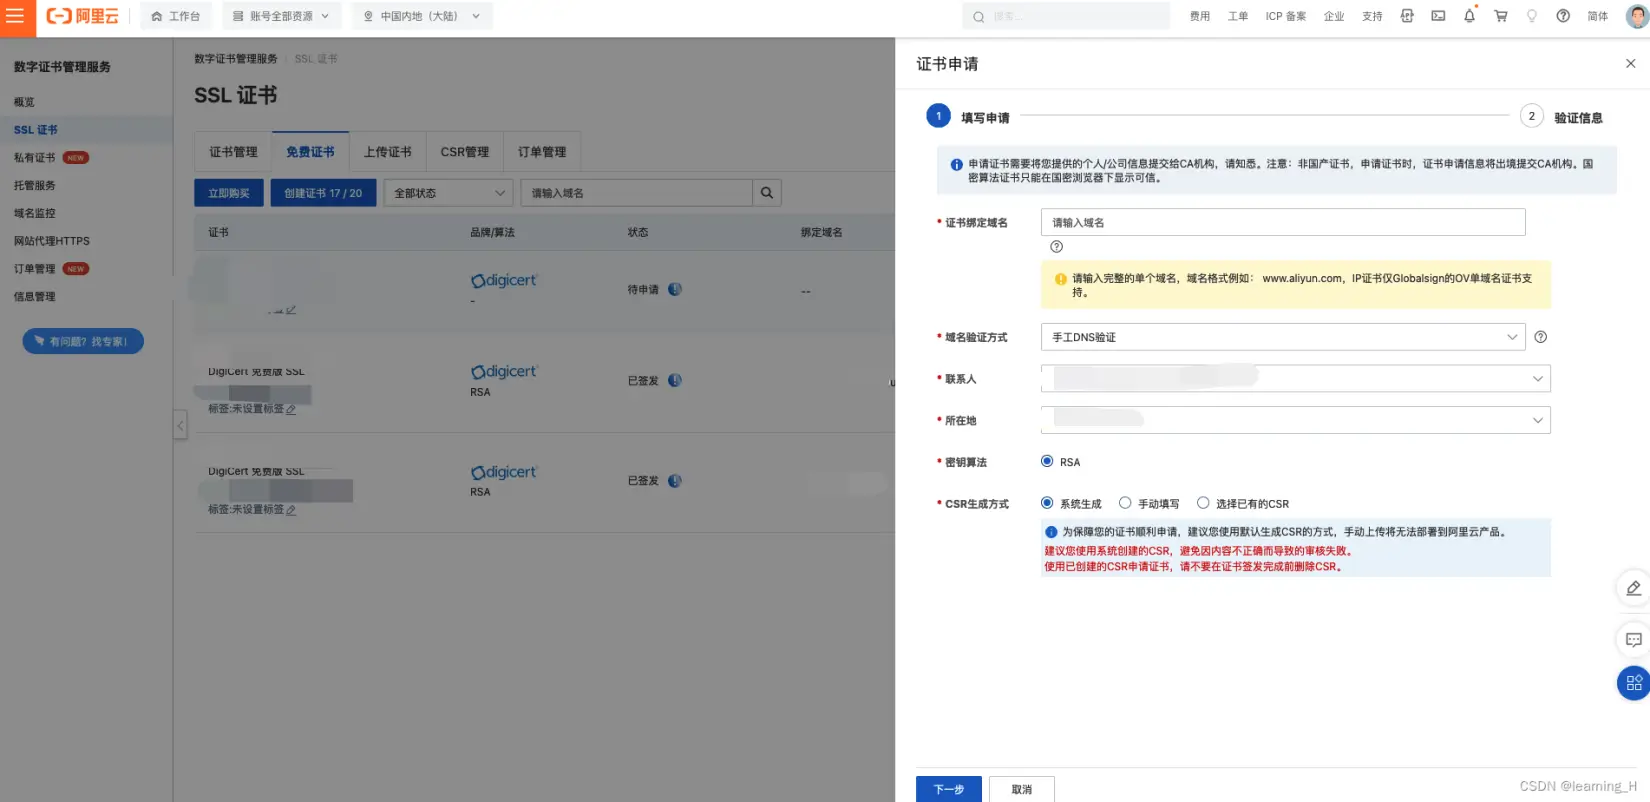
6.申请好之后,还是在这个页面点击「创建 20 / 20」按钮,创建一个证书,并点击操作栏的「申请证书」正式申请你的证书。

在申请页面中,输入以下几个必填信息(以实际页面为主):
- 证书绑定域名
- 域名验证方式
- 联系人
- 所在地
- 密钥算法
- CSR 生成方式
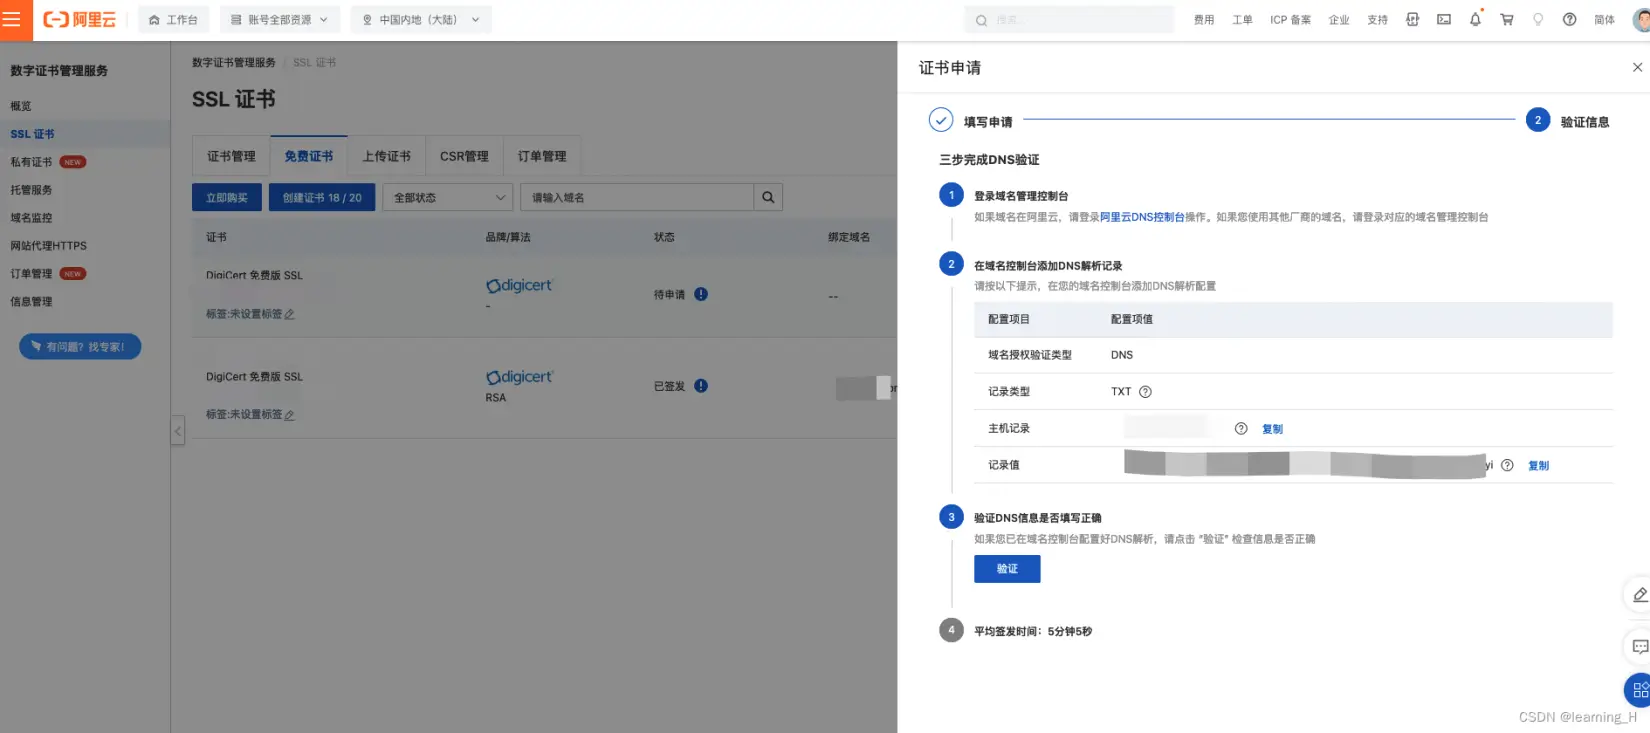
7.然后点击下一步,在对应的阿里云DNS控制台添加已生成的 DNS 解析记录。这个一般人家都会帮你生成好,等5分钟左右,回到证书申请页面,点击「验证」即可

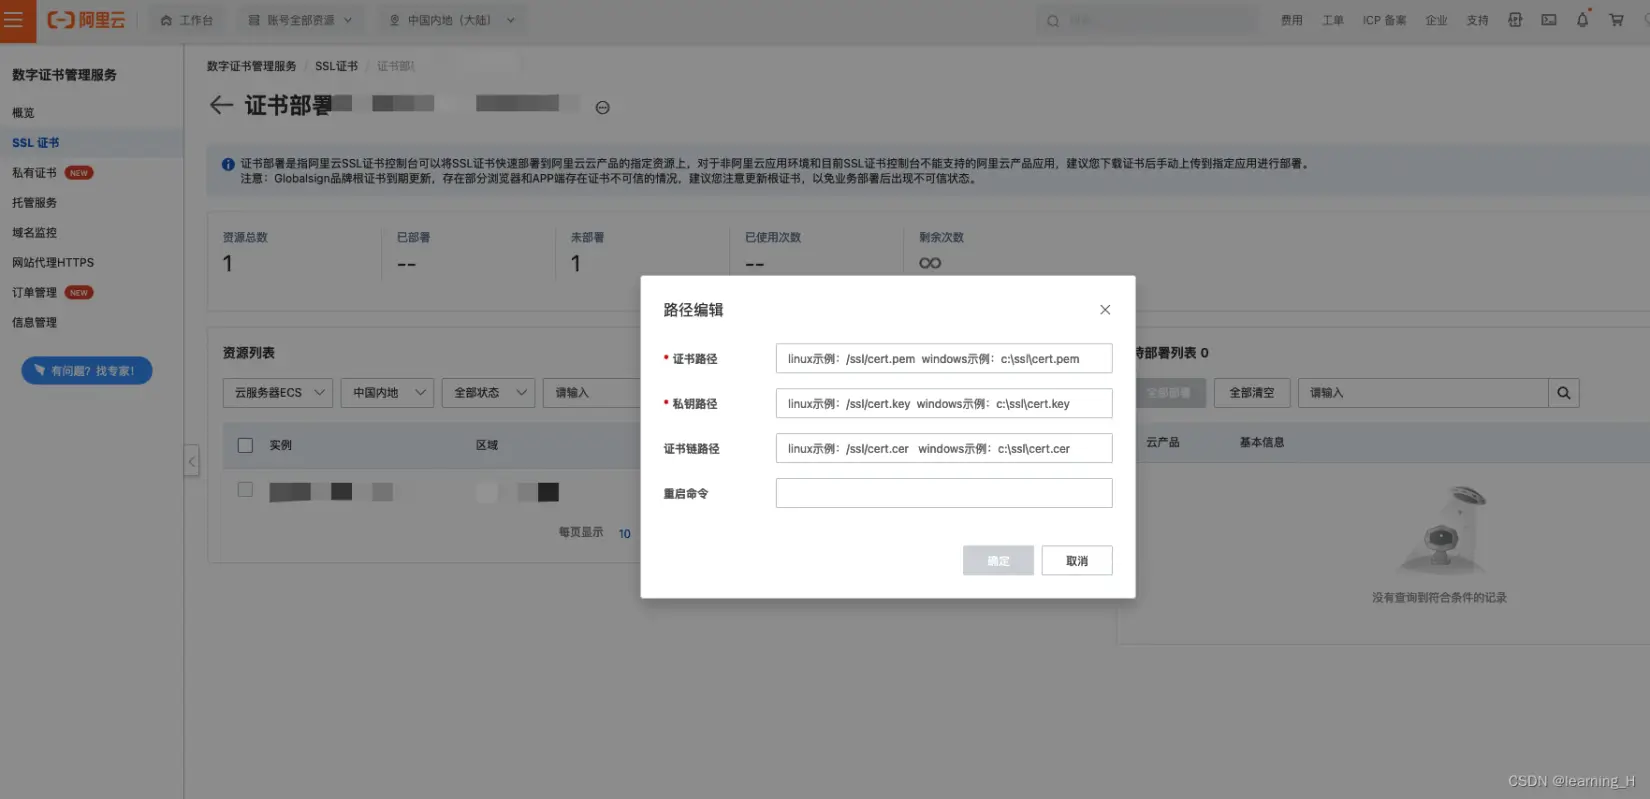
8.完成上述步骤之后,我们点击证书列表操作栏中的「部署」按钮,跳到「证书部署」页面:
- 选择资源列表-云服务器 ECS
- 在自己的 ECS 服务器上进行部署(点击「部署」按钮)
- 自定义证书路径和私钥路径
- 点击确定之后,就会在你的 ECS 上生成对应的证书及其私钥

如果不知道如何配置,可以点击右上角的「帮助文档」,傻瓜式粘贴复制。
如果在确认之后,一直迟迟没有好,那可能出现了 BUG,我查看了接口之后发现接口报错了,然后登到服务器之后又发现,证书已经OK了。
9.在部署好 SSL 证书之后,回到 ECS 云服务器,里面会根据部署时设置的路径生成对应的证书和密钥。我们重新编辑 nginx.conf文件,在里面添加 SSL 部分的配置:
server {
  listen       443 ssl;
    server_name  <your_server_name>;
    ssl_certificate       <your_pem_path>;
    ssl_certificate_key   <your_key_path>;
	  ssl_session_timeout 5m;
    ssl_ciphers  HIGH:!aNULL:!MD5;
    ssl_prefer_server_ciphers on;
    root <your_server_root_path>;
    index  index.html index.htm;

    location /api/ {
      proxy_pass  localhost:3333;
      proxy_set_header  Host $proxy_host;
      proxy_set_header X-Real-IP $remote_addr;
    }
}
10.最后重载 nginx配置即可。
配置 HTTP2
要开启 HTTP2,首先要做的就是需要给 Nginx 安装一下 http2 模块,而 HTTP2 的配置是基于 SSL 的基础之上的,所以我们要先确保已经安装过 SSL 模块,如果没有安装,那我们刚好可以一次到位:
# 进入到 /usr/local/nginx/nginx-1.19.9/ 目录中
./configure --prefix=/usr/local/nginx --with-http_stub_status_module --with-http_ssl_module --with-http_v2_module
安装好之后重复之前 SSL 的步骤即可。
然后在 Nginx 配置中增加一些配置项即可:
server {
    # 监听ipv4的443端口并设置允许http2
    listen       443 ssl http2;
    #监听ipv6的443端口并设置允许http2
    listen [::]:443 ssl http2;
  	#监听指定的域名, 填写绑定证书的域名
    server_name  note.ihsxu.com;
  	#设置证书
    ssl_certificate       /ssl/note.pem;
    ssl_certificate_key   /ssl/note.key;
    ssl_session_timeout 1h;

    # 设置支持的TLS版本
    ssl_protocols TLSv1.1 TLSv1.2 TLSv1.3;
  	#按照这个套件配置
    ssl_ciphers  ECDHE-RSA-AES128-GCM-SHA256:HIGH:!aNULL:!MD5:!RC4:!DHE;
    ssl_prefer_server_ciphers on;

    root /var/www/md-note/client;
    index  index.html index.htm;

    location /api/ {
        proxy_pass    http://localhost:3333/;
        proxy_set_header  Host $proxy_host;
        proxy_set_header X-Real-IP $remote_addr;
        proxy_set_header REMOTE-HOST $remote_addr;
        proxy_set_header X-Forwarded-For $proxy_add_x_forwarded_for;
    }
}
然后 nginx -s reload即可。
开启 GZIP
Gzip 是一种常用的压缩算法,可用于减小 HTTP 响应的大小,从而提高网站的加载速度。在 Nginx 上开启 Gzip 只需要在 nginx.conf配置文件中的 http上下文中增加对应的配置项即可。
以下是一份在 1核2G 轻量云服务器中有关 Gzip 压缩的最佳实践:
- 开启 Gzip 压缩:只需要启用必要的 MIME 类型来进行 Gzip 压缩
gzip on;
gzip_types text/plain text/css application/json application/javascript text/xml application/xml application/xml+rss text/javascript;
2.调整 Gzip 压缩级别和缓存区大小:如果希望能获得更多的压缩效果,可以适当的调整 Gzip 压缩的级别和缓存区大小等配置。比如下面配置中,将压缩级别设置为6(默认为5),最小压缩长度设置为 256 字节,以及设置了 16 个缓冲区,每个缓冲区大小为 8 KB。
gzip_comp_level 6;
gzip_min_length 256;
gzip_buffers 16 8k;
3.禁用不必要的 Gzip 压缩,比如禁用 IE6 浏览器的 Gzip 压缩功能
gzip_disable "MSIE [1-6]\.";
4.禁用 Gzip 预压缩和静态文件压缩:预压缩和静态文件压缩会消耗更多的 CPU 资源,因此在资源受限的服务器上,我们可以将其禁用掉。
# gzip_static 有可能遇到报错,因为版本过低或者安装的 Nginx 中没有这个指令模块,可以选择不设置
gzip_static off;
gzip_vary off;
常见问题
1. SSL: error:0B080074:x509 certificate routines:X509_check_private_key:key values mismatch
这个意思就是**私钥和证书不匹配,**重新生成一下就可以了。如果还不成功,就多重新生成几次,直至成功为止。
我们可以在每次生成之后都去验证一下二者是都匹配:
openssl x509 -noout -modulus -in <ssl_pem_path> | openssl md5

openssl rsa  -noout -modulus -in <ssl_key_path>  | openssl md5
当二者都相等时说明就可以了。
2. nginx: [error] open() "/usr/local/nginx/logs/nginx.pid" failed (2: No s
这个大多是因为重新编译了 nginx 之后,没有进到 sbin下执行 ./nginx导致的,执行之后会生成一个 nginx.pid,然后再执行 nginx -s reload即可。